Thursday, September 13, 2018

Wasteland 2

In this nifty Humble Unity Bundle there was Wasteland 2:Directors Cut included.

I had an eye on this some years ago but never came to play it.

So, since this is supposed to be an game blog, I will *breathes meaningful* share my experience here with you, the reader. Or bot. Or crawler. Or way back machines.

Actually. I don't care.

So I played a quick "What would I get into" round yesterday.

"Rookie" level


Just the default party and "Rookie" level.

It is an XCOM-Style RPG in a scenario where a cold war between two super nations, USA and USSR went hot and those poor souls survived it.

The isometric areas look very good, the interface is quite usable.

Lot of text, up to what I have read default writing fitting the scenario.

I went to the first object as same kind of humble ranger guard force to investigate the murder of one of their own. ("OFFICER DOWN ! OFFICER DOWN !") 

The next day


So today, after having my evening FPS practice, I decided to test it for half an hour max, while writing what comes to my mind.

So, while choosing the portrait of my first custom character, a refined 32-year old Yew whose good with guns, I noticed that you can not customize your 3D figure so that it matches the portrait for you character.

Also half of the torso gear looked less than the scenario that spawns this universe, but more of a strange dirty cyberpunk wash uped gear.

Toaster Repair

While intensively reading up on the skills and abilities, I notice that there is a ability called "Toaster Repair". In the description its only purpose is to repair toasters.

The rest is pretty default, critical chance, various weapon skills.

If you spend enough weapon skill points, you get a special ability, but there is no way to get a description for it in the creation menu. Bad.

But I think I start to know which angle I should use when playing this. You can give a customized character one Quirk, if you choose to.

These quirks are, of course, (s.a. Toaster Repair) mostly ridiculous. You can be so unlucky but then there is a random chance your enemy gets hit by a lighting, for example.

So, you can not really build a characters from the scratch having a certain feeling of control while doing it,no. It is more a taste thing and actually just luck. That is my impression so far, making me a bit nervous. But also I get the distinct feeling I am preparing for a trip into some action comic world.

That's it for today, perhaps more tomorrow.


Tuesday, August 21, 2018

Dwelling in Source - Part 1

Since I have some time today I will get into the Source world with trying to import objects from Day of Infamy into Blender and mix it with my new prototypes for my Day of Infamy Map.

so, first I seem to need to get the Blender Source Tools from Valve here.

I did that last time I managed to import a object into Day of Infamy, but without the textures, too.

That is the first tutorial I found about this specific topic.

How to decompile the DoI files ?

Well, there were tools from third-parties in the past. As far as I understand it now, you just can use vdk.exe in the bin directory from your DoI steam install. (not sure if you have to install the sdk prior, have to look that up again)

After a few not working attempts I finally managed to move doi_models_dir.vpk over the vdk.exe, and heureka, it decompiled the models.

That was easy, but the models and textures still were in some meta format that made me unable to load them directily with the supposedly outdated blender import tools from valve anyway.

Anyway, I now manage to import some of the fully decomplied sdk example weapons and found the decompiled materilas for it.

But I switched for some reasons while reading up on .cq files to Hammer, which still didnt work since I reinstalled a fresh Windows and changed the steam directories due to volume name changes.

That lead me deeper into some areas where I then frust-read some more and found out that you have to change the directories in GameInfo,txt in the steam game bin directory of Game of Infamy...eh Day of Infamy.

So now Hammer works again fine and I will chill down and watch some hammer tutorials for ... fun.


Wednesday, August 1, 2018

Arma3 Modding - On to dissecting the house example !

NArma3 Modding - On to dissecting the house example !

After I managed to somewhat trick my way into importing my test model into the actual arma3 game, I know have to dissect the example house add-on, from which I simply copied the most config text files, while exporting my model directly to .p3d with the Blender Arma Toolset. (see last posts)

First next stupid thing is that I will strip everything in the files that I think are not necessary.

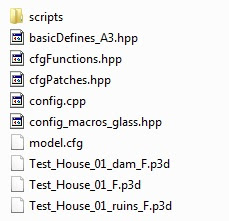
This are the files and the script folder.


- basicDefines_A3.hpp

C like definitions, lots of them. Seems mostly unrelated default stuff, like scope settings, true and false, some missile stuff.

I will remove all of them except the true and false.

=> They are there cause everything is a vehicle for the arma engine.

- cfgFunctions.hpp

The description says its a "Set of functions for animating opening and closing of doors with and without handles."

Inside is the CfgFunctions class, the A3_Samples class, seems more like a namespace thing, a BIS tag and a Scripts class with a string file system path to the scripts folder and four abstract class definitions of the doors.

Hmm. My model has no doors, yet.

I will remove all inside the CfgFunctions class, rather comment it out.

- cfgPatches.hpp

This class defines which units (vehicles) are defined in the addon. We have exactly one vehicle in this add-on, class Test_House_01. I still do not know what A3_Structures_F is, it is the name of the only AddOn this AddOn requires. Also three models for every self-defined state the house 'vehicle' can be in, whole, damaged and in ruins.

Since I think the House is inherited from a model in the A3_Structures_F, I will remove both damaged and ruined state only.

- config.cpp

The mother of all the files of an addon, it seems. It includes all of the above and macros for glass.

The CfgVehicles holds the class implementations with the exact name as in the cfgPatches.hpp

"So, the cfgPatches class is the skeletton, the config.cpp is the meat." - me, when I had it for a second

TODO: Write a short summary of the exact nature of the relationship with CfgVehicles and CfgPatches.

Back to config.cpp.

House is the base class. I should check here the official arma docu, but I skip that for now.
House_F, whatever the F means, inherits from House but adds a DestructionEffectClass to itself.

Land_Test_House_01_F inherits from House_F, every following state inherits from the former.

So there are a lot values in the Land_Test_House_01_F class. I will remove the whole damage system.

So I removed all the door things as well. What is left is short and handy.


- config_macros_glass.hpp

I hope nobody had to write this defintion file by hand. I will remove the file and its include in the config.cpp.

- model.cfg

Last model.cfg is up. It contains two classes, CfgSkeletons and CfgModels.

Skeletons are basicly Arma's Rigs as far as I understand that. Not sure yet. Seems you do door animations and stuff with it.

Now the CfgModels class use the Skeletons and structures things like Animations. There is also a class for the damages house, where just some of the house and window interaction are missing.

I will remove everything except the Default Class inside the CfgModels and a stripped class of the House.

Close

I removed the two equal but unnecessary p3d's and the scripts folder.

This should as far as I know work. Let me try.

So. Yes. This works !!!


Now to clear up the details of this working barebone.
And to get the texture on the model.

Tuesday, July 31, 2018

Arma 3 - Still how to import a 3D model into the arma3 engine - Part 3

Arma 3 - Still how to import a 3D model into the arma3 engine - Part 3

So. After my last attempt did not really brought any results, I will now try it with a bit more complex model with no material texture.


The model is very clean designed, all normals are perfect, no playing around, double sided everywhere and fully triangulated.

So what can I do ?

Firstly, I have to check tutorials about import a 3ds model again and try it naively again with Object Builder.

I will make a new folder on the mounted P: project drive for this, call it smallTower for the sake of it.

Right. Now I have this strange KFDATA section missing import error again.


There are not really any options when you export a 3DS from Blender, so I am not sure what to do.

Wow, there seems to be some kind of exporter addon for Blender and Arma ! *excited face*

All right, the FHQ Arma Toolbox for Blender is a thing ! I yet have to figure out if this is still working with Object Builder, since it was made to work with Oxygen.

BUT the O2Script.exe is still there in the Object Builder directory. I have read half through their interesting pdf and well, you have to quite tune some parameters BUT you actually learn a lot, at least I did by understanding them. More or less.

Wow. I cant believe it. The p3d export I did with The Toolbox actually loaded into Object Builder without errors !


Now on to the details :

1. Did it correctly use the Color Material I created in blender with the toolbox or do I need to add an texture texture ?
2. Will it work in Buldozer but more important in Arma with the configs I made before ? And why, if ?

But of course, now Buldozer isn't loading and crashes. Why ? It worked perfectly last time. :-(

I looked into the first post, and found the trashy solution : First you have to select the version of the viewer on your mounted P: drive, let it crash, then restart Buldozer Config, set Path to Viewer inside Game Directory Button Checked and resolution, then restart Object Builder and start Buldozer.

w.t.f. but it works. so. I am as far as I was in post 2, BUT I managed to use the Blender Export Toolbox from some very good community mod tool maker to successfully create a working p3d, at least working inside the Object Builder.

Now to the next details.
First a little break.

So. Same error in the arma rtp.

21:09:23 Warning Message: Cannot open object smalltower.p3d
21:09:23 smalltower.p3d: No geometry and no visual shape

 Hmm. I am making something wrong or miss something elementary.

It might be that I need to add a default LOD (level of detail), since Arma is using some predefined LOD names and sets for various ingame functionality declaration (Convention over configuration meets half documentation- grandiose)

So back to the details after a break. 

So I came up with some sort of hack, that actually works and will be my next point of reference.

I copied the house example add on non-binarized, just added my p3d and change the name in the config.cpp.


Of course the scale is wrong. But well, this means I am on the right track.

Now to the right scale and a basic house texture !

After.... a break....


Friday, July 27, 2018

Arma 3 - How to import a blender model - Part 2

Arma 3 - How to import a blender model - Part 2

So, I added a config.cpp and put the .p3d, the .paa and the config.cpp in one folder. Then I run AddOn Builder on that folder, and it worked.

But the object is not showing up anywhere, which may be cause I used a rather patch-worked config.cpp, which cleary is wrong.

Here is the config.cpp so far :

The Model in my addon has now an entry in the Props=>Structures=>Village, since it is inherited from Building, I guess.

But there is a problem to load the .p3d Model file !


I am not sure why this, cause the AddOn Packer had no errors, I checked all logs. So seems I  have to find out where the log file for this error in arma3 is, which rtp most likely, now.

so its in the common log file in the local windows arma3 folder.

and there are the two lines that matter : 

- import_2.p4d.p3d: No geometry and no visual shape
- Trying to create an invalid center EMPTY 


I am a bit confused by this, but will go back to Object Builder and look what is wrong or missing.

Thursday, July 26, 2018

Arma 3 - How to import a blender model - Part 1

Arma 3 - How to import a blender model - Part 1

In my today's try to get ahead in Arma3 Editing, I want to import a building into Arma 3 which I modeled in Blender.

So as always I took a quick look at tutorials to refresh my memories. I do not want any YouTube tutorials or so, just text and pictures.

On the first I found :

Arma 3 Basic Modeling Import Tutorial for Noobs - Difficulty EASY

and this entry on the bohemia forums.

This seems quite ok for the start. So now I model a quick easy non-accessible building with some texture blocks I extracted today somewhere.

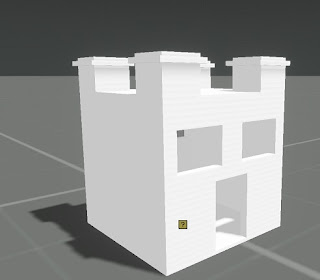
This is my , very basic, building I want to import :


So I had them installed long time ago, but I was missing the Arma3 Tools, *happy sound*, so I got them over Steam.

As far as I understood, it should be fairly easy to import a (blender) model with O2, a tool provided by Bohemia.

Well. Ehm. In the Arma3 Tools, which actually have a pretty menu now and wow.But I cant find O2, and I remember vaguely it was TexView 2 I used, did I ?

Well. It is the object builder I am after it seems, but the first time I pressed on it, nothing happened and the arma3 tools crashed. :(

After trying a lot I must admit that nothing works with the arma3 tools.

I get a strange .net error in the windows logs and the logs of arma3 tools itself are saying nothing.

I have to read further into this. Stay tuned !!!


Well, it chained my mind to it, so I read on, despite being terrible fatigue. What do you do when you do not know what do to ? Yes. RTFM. So.

Arma_3_Tools_Installation

Maybe, just maybe, I find the reason for the Object Builder crashing here. And I did, it seems.

Buldozer, the 3D Viewer Module (previous Oxygen, I remember that !) of Arma3 has to be installed on a virtual drive. And yes, an actual virtual drive with the letter P: ! Click here to read the full tragedy or what they call documentation :D !


Hurrai ! Now lets import my .obj 3D File which I exported from Blender !!

We got our first error message !!! At least the infrastructure seems now to be solidish.


So, I triangulated my model in Blender. And while I was there, I exported the model as 3ds_max .3ds format, but I got this error message :


I never worked with max, well I did hunderts of years ago. Hmm. Then again as obj !

HEUREKA ! I imported my model into the object builder as obj. (Always triangulate !)


Of course the texture is missing and the normals seem to be turned around. Have to read up upon that after a extensive short break.

In Blender, I exported the file again to obj, and before that I revered the normals. But it still looked like that inside-out, so I reveresed it with the Reverse Option under Faces inside the Object Builder. And now it looks correct, still missing the texture, and when I start Buldozer alias Arma3 as viewer, it still crashes.


But I think I just need to add some very basic project respective addon definition files to make it work inside Arma3. *reads up*

Well, now Arma crashed and I know why. I had to change to path of the arma3 buldozer viewer to that of its version inside the game path !!! And I set the resolution to default, also.

And now it works and the model is loaded, yet without the texture, but the UV Map is inside the object builder, I saw that.


Hmm The UV is fine.

So what the bush is going. I converted the .png texture to a .tga, cause it seems this is one of the formats the object builder can use, png is not.


I converted the png to 256x256 non-compressed tga. Then I started Buldozer, which converted the "resources", then in the Object Builder I activted DirectX (via the Atomic Icon) and Textures (via another icon, hover !) and voila, the texture work in the work windows of Object Builder ! *dances*


I then used the good old Tex View ... 2 ! to convert the tga to a paa, which is a packed texture format for arma3's engine. I then assigned the paa to the object, which turns the texture off in the object builder BUT it then works in the Buldozer Viewer, which depends on a working addon format on the fly as far as I understand that right now.


So now I need to pack it and before that I think I need to find some templates for placable object definition files somewhere...*close to sleep cause late* .... *mobilizes reserve energy*

I put the p3d and the paa into one directory and tried to run the AddOn Builder on that directory.
As excepted now the last thing is a missing description of some sort, like a hhp file, I remember only vaguely.

So. I am downloading the official steam example arma3 file, but I will google this before I go sleep and I need to seriously get hydrated.


Wednesday, July 25, 2018

Arma3 Beginner Mission Editing : Non-Fly-Zone Message

Hidiho !

Lets do some Arma3 Mission Editing ! (we <= me !)


I played GTA5 a bit over the last weeks to finally get this monstrosity under the hood. I am quite disappointed by its story and its obvious single reason to condition the player for the GTA5 online money grap experience.

BUT I finally am good in computer helicopter flying. For some reason I now like the Arma3 helicopter fly model. So now I am playing around and do a flying training course for civilian helicopters on Stratis and then Malden.

Level: Beginner

So, first I wanted areas where players can fly over like cities or military areas, at least not without an official reason.

My arma scripting is still on arma2 level and still quite rusty. So, assuming yours is too, I do this bit by bit. Remember, this is mainly for me to log the process here :D

1. The voice

First, you want to have a radio message like "Ey, don't fly here or we shoot" or something.
Eventually I used :  "Unidentified aircraft. You are entering a restricted air zone. Turn around or be fired upon."

So where to get a voice ? I am not a native english speaker, and I like temporary voice acting more than some half solid work, so I used naturalreaders.com  but any text-to-speech should do.

I used Audacity to convert it into the .ogg Soundfile format.

To make the sound available ingame, you have to edit the description.ext in the scenario folder, create the file if it does not exist.

Then this works for me :

class CfgSounds
{
     sounds[] = {};
   
     class RestrictedAirzone  {
         name = "RestrictedAirzone";
         sound[] = {"\sound\arma_voice_syn_restrictedAirspace.ogg", db+5, 1.0};
         titles[] = {1,"Unindentified aircraft. You are entering a restricted air zone. Turn around or be fired upon."};
     };

};

2. Play it

Then you put a trigger according to your needs and for the sake of convenience I most of the time put player say2D "RestrictedAirzone"; in the activation field of the trigger to start the sound playing and the title showing up.